APPOINTMENT FOR AADHAR ENROLMENT: Aadhaar is a 12-digit unique identifying number given by the Indian government to each Indian resident. It serves as proof of identity and address and is mandatory for availing of several government benefits and services. The appointment for Aadhaar enrolment is the first step towards obtaining an Aadhaar card. This article provides a comprehensive guide to the appointment process for Aadhaar enrolment.
What is Aadhaar Enrolment?
Aadhaar enrolment is the process of obtaining an Aadhaar card. The individual’s personal and biometric details are captured and verified during enrolment. The Aadhaar card contains the individual’s demographic and biometric information, which serves as a means of identity verification.
Why is an Appointment Necessary for Aadhaar Enrolment?
An appointment for Aadhaar enrolment is necessary to ensure a smooth and organized process. The appointment helps avoid long wait times and ensures that the enrolment process is completed efficiently. Moreover, the appointment provides the enrolment center with the necessary infrastructure and technology to complete the enrolment process.
How to Book an Appointment for Aadhaar Enrolment?
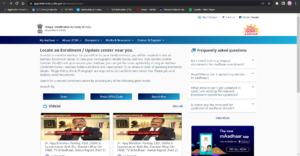

The appointment for Aadhaar enrolment can be booked online through the UIDAI website or by visiting an enrolment center. Booking an appointment online is convenient and hassle-free and can be done from the comfort of one’s home. Below are the steps to book an appointment. Visit the UIDAI website https://appointments.uidai.gov.in/ :
- Click on the “Book an Appointment” tab
- Select the state, and postal code and then hit the search button as shown in the figure
- Fill in the required details such as name, mobile number, email ID, and location
- Choose a convenient enrolment center and date and time for the appointment
- Confirm the details and complete the booking process by paying a nominal fee if required
Once the appointment is confirmed, an appointment slip is generated, which contains the enrolment center details, date, and time of the appointment. The appointment slip must be carried to the enrolment center on the day of the appointment.
Enrolment Process
The enrolment center is equipped with the necessary infrastructure and technology to complete the Aadhaar enrolment process. Below are the three steps for enrolment:
- Demographic Data Capture: This involves filling the enrolment form with personal details such as name, address, date of birth, gender, etc. It is essential to ensure that the information provided is accurate and up-to-date.
- Biometric Data Capture: This involves capturing fingerprints, iris scans, and facial photographs. These biometric details are unique to every individual and serve as a means of identity verification.
- Document Verification: This involves submitting proof of identity and address such as a PAN card, driving license, passport, etc. It is essential to carry the original and photocopy of the documents for verification.
After the completion of the enrolment process, an acknowledgment slip is generated, which contains the enrolment number. The enrolment number can be used to track the status of the Aadhaar card.
Important Points to Remember
- It is important to note that the appointment for Aadhaar enrolment must be kept, and the enrolment center must be visited on the date and time mentioned in the appointment slip. In case of a missed appointment, a fresh appointment must be booked and the enrolment process must be repeated.
- It is also essential to carry the original and photocopy of the required documents for verification. The demographic and biometric details captured during the enrolment process must be accurate and up-to-date to avoid any delays or inaccuracies in
- Aadhaar enrolment is mandatory for every individual above 5 years of age in India. It is a 12-digit unique identification number issued by the UIDAI (Unique Identification Authority of India) and serves as proof of identity and address. The enrolment process involves capturing the personal and biometric details of the individual, which are then stored in the UIDAI database.
Process of Rescheduling & Cancellation:
Rescheduling:

Follow the steps/procedures below to reschedule your Aadhaar card appointment online:
Step 1: Go to the government website https://appointments.uidai.gov.in/
Step 2: Beneath My Aadhaar, choose “schedule an appointment.”
Step 3: Choose a City
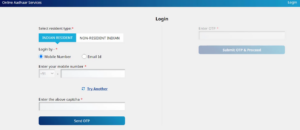
Step 4: Mention your email address or phone number.
Step 5: Type in the captcha code.
Step 6: Select the ‘Send OTP’ option.
Step 7: The appointment ID will appear. Choose “booking information” from the dropdown menu.
Step 8: In the “Do you want/wish to reschedule?” pop-up, select “Yes.”
Step 9: Select the ‘book an appointment’ option.
Step 10: Choose a new date. Step 11: Click Submit, and then Confirm.
Cancellation:
Mentioned below is the process of cancellation of an appointment:
Step 1: Go to the Aadhaar Appointment Cancellations Page.
Step 2: Enter your Token ID.
Step 3: Enter your Phone Number.
Step 4: Select Cancel Appointment. When you click Cancel appointment, your Aadhaar Enrolment will be terminated.
Step 5: You will also be notified through SMS that the appointment planned there under the token id has already been canceled.
Check your Aadhaar appointment status by following the steps below:
The applicant can verify the status of their Aadhaar card by visiting the UIDAI official website. There are no fees or penalties to check the status of your Aadhaar card on UIDAI’s official website. To check the status of the Aadhaar card application online, follow the procedures outlined below:
With Enrolment ID
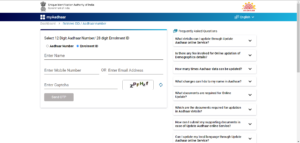

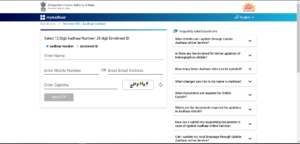
Step 1: Go to https://myaadhaar.uidai.gov.in/check-aadhaar to check your Aadhaar status.
Step 2: Enter your EID (Enrolment ID) and captcha code on your enrolment/update acknowledgment sheet to verify the status of your Aadhaar card.
Step 3: The Aadhaar creation status will be presented in the following order: Drafting Stage > Payments Stage > Verification Phase > Validation Phase > Completed.
Without Enrolment ID
If you’ve misplaced your enrolment number or missed the acknowledgment slip, you can locate it and afterward check your Aadhaar card status with the enrolment number. Mentioned below is the process to check the status without the E-ID:

Step 1:To get your enrolment number, click on https://myaadhaar.uidai.gov.in/retrieve-eid-uid.
Step 2: Select whether you want to retrieve your Aadhaar or Enrolment number.
Step 3: Enter your name, email address, cell phone number, and security code to send an OTP to the registered mobile number.
Step 4: To verify, enter the OTP obtained.
Step 5: After verification, the Enrolment number/Aadhaar will be emailed or texted to your registered cell phone number or email address.
Step 6: You may now verify your enrolment status using this enrolment number.
Here are some additional points to keep in mind while enrolling for Aadhaar:
- Document Requirements: To enroll for Aadhaar, individuals must provide proof of identity and address. Acceptable documents include a passport, PAN card, driving license, Voter ID, etc. Suppose the individual does not have any of the documents mentioned above. In that case, they can provide a passport of a close relative or a letter from a recognized public authority or gazetted officer as proof of identity.
- Biometric Details: During the enrolment process, biometric details such as fingerprints, iris scans, and facial photographs are captured. These details are used for authentication purposes and are necessary to ensure the uniqueness of the Aadhaar number.
- Mobile Number Linking: Linking a mobile number with an Aadhaar card is mandatory. The mobile number serves as a means of authentication and is used for various purposes such as downloading e-Aadhaar, availing government benefits, etc.
- Online Enrolment: Individuals can also enroll for Aadhaar online by visiting the UIDAI website. The process involves filling out the online enrolment form, uploading the necessary documents, and scheduling an appointment for biometric capturing at an enrolment center.
- Enrolment Centers: Enrolment for Aadhaar is conducted at authorized enrolment centers across the country. Individuals can locate their nearest enrolment center by visiting the UIDAI website and entering their postal code.
- Appointment Booking: The enrolment process can be made more convenient by booking an appointment at the enrolment center. This ensures that the individual does not have to wait in long queues and can complete the enrolment process at a time that is convenient for them.
- Time Limit for Enrolment: Individuals eligible for Aadhaar must enroll within the stipulated time frame. Please enroll within the specified period to ensure the individual is eligible for various government benefits and services.
- Updating Information: It is important to update the Aadhaar information periodically to ensure that it is accurate and up-to-date. Changes such as an address, name, date of birth, etc. can be updated online or by visiting an enrolment center.
- Multiple Enrolments: It is not allowed to enroll for Aadhaar multiple times. Individuals who have already enrolled for Aadhaar must wait to enroll again. This may lead to the deactivation of the previous Aadhaar and result in a loss of benefits and associated services.
- Aadhaar Seeding: Aadhaar seeding links Aadhaar with various government schemes and services. This ensures that the individual is eligible for government benefits and subsidies. It is important to seed the Aadhaar with bank accounts, insurance policies, pension schemes, etc., to avail of the benefits.
- Lost or Stolen Aadhaar: In case of loss or theft of an Aadhaar, individuals can apply for a duplicate Aadhaar by visiting the UIDAI website or by visiting an enrolment center. The process involves filling out a form, providing necessary documents, and paying a nominal fee.
In conclusion, the appointment for Aadhaar enrolment is the first step towards obtaining an Aadhaar card. The enrolment process is simple and convenient and can be completed by visiting an enrolment center or booking an appointment online.
Q1. Do I need to book an appointment for Aadhaar update?
Yes, it is generally recommended to book an appointment for updating your Aadhaar card. This will help you avoid long wait times and ensure that the Aadhaar update process is smooth and efficient.
You can book an appointment for Aadhaar update through the official UIDAI website (https://uidai.gov.in/). Click on the “My Aadhaar” tab & select “Book an Appointment” from the menu. Follow the instructions on the screen to select your nearest Aadhaar Seva Kendra, choose the service you require, and book an appointment slot that is convenient for you.
You can also book an appointment for Aadhaar update by calling the UIDAI toll-free number (1947) or by visiting the nearest Aadhaar Seva Kendra directly. However, it is recommended to check the availability of the service and appointment slots before visiting the center to avoid any inconvenience.